(1) 213-459-3517

.jpg?x-oss-process=image/auto-orient,1/quality,q_100/resize,m_mfit,w_1000,h_1000 "Maxpeedingrods 24 Way Damper Coilovers Kit compatible for Honda Civic 88-91Integra 90-93")

.jpg?x-oss-process=image/auto-orient,1/quality,q_100/resize,m_mfit,w_1000,h_1000 "Maxpeedingrods 24 Way Damper Coilovers Kit compatible for Honda Civic 88-91Integra 90-93")
.jpg?x-oss-process=image/auto-orient,1/quality,q_100/resize,m_mfit,w_1000,h_1000 "Maxpeedingrods 24 Way Damper Coilovers Kit compatible for Honda Civic 88-91Integra 90-93")
.jpg?x-oss-process=image/auto-orient,1/quality,q_100/resize,m_mfit,w_1000,h_1000 "Maxpeedingrods 24 Way Damper Coilovers Kit compatible for Honda Civic 88-91Integra 90-93")
.jpg?x-oss-process=image/auto-orient,1/quality,q_100/resize,m_mfit,w_1000,h_1000 "Maxpeedingrods 24 Way Damper Coilovers Kit compatible for Honda Civic 88-91Integra 90-93")
.jpg?x-oss-process=image/auto-orient,1/quality,q_100/resize,m_mfit,w_1000,h_1000 "Maxpeedingrods 24 Way Damper Coilovers Kit compatible for Honda Civic 88-91Integra 90-93")
.jpg?x-oss-process=image/auto-orient,1/quality,q_100/resize,m_mfit,w_1000,h_1000 "Maxpeedingrods 24 Way Damper Coilovers Kit compatible for Honda Civic 88-91Integra 90-93")
.jpg?x-oss-process=image/auto-orient,1/quality,q_100/resize,m_mfit,w_1000,h_1000 "Maxpeedingrods 24 Way Damper Coilovers Kit compatible for Honda Civic 88-91Integra 90-93")
.jpg?x-oss-process=image/auto-orient,1/quality,q_100/resize,m_mfit,w_1000,h_1000 "Maxpeedingrods 24 Way Damper Coilovers Kit compatible for Honda Civic 88-91Integra 90-93")
.jpg?x-oss-process=image/auto-orient,1/quality,q_100/resize,m_mfit,w_1000,h_1000 "Maxpeedingrods 24 Way Damper Coilovers Kit compatible for Honda Civic 88-91Integra 90-93")
.jpg?x-oss-process=image/auto-orient,1/quality,q_100/resize,m_mfit,w_1000,h_1000 "Maxpeedingrods 24 Way Damper Coilovers Kit compatible for Honda Civic 88-91Integra 90-93")
.jpg?x-oss-process=image/auto-orient,1/quality,q_100/resize,m_mfit,w_1000,h_1000 "Maxpeedingrods 24 Way Damper Coilovers Kit compatible for Honda Civic 88-91Integra 90-93")
.jpg?x-oss-process=image/auto-orient,1/quality,q_100/resize,m_mfit,w_1000,h_1000 "Maxpeedingrods 24 Way Damper Coilovers Kit compatible for Honda Civic 88-91Integra 90-93")
.jpg?x-oss-process=image/auto-orient,1/quality,q_100/resize,m_mfit,w_1000,h_1000 "Maxpeedingrods 24 Way Damper Coilovers Kit compatible for Honda Civic 88-91Integra 90-93")
.jpg?x-oss-process=image/auto-orient,1/quality,q_100/resize,m_mfit,w_1000,h_1000 "Maxpeedingrods 24 Way Damper Coilovers Kit compatible for Honda Civic 88-91Integra 90-93")
.jpg?x-oss-process=image/auto-orient,1/quality,q_100/resize,m_mfit,w_1000,h_1000 "Maxpeedingrods 24 Way Damper Coilovers Kit compatible for Honda Civic 88-91Integra 90-93")


Editor’s note:Roy White, currently fully rebuilt his 1995 Honda civic with MaXpeedingRods adjustable coilovers. In this article, he shared his using experience, particularly with install guidance and how he managed to get them even.
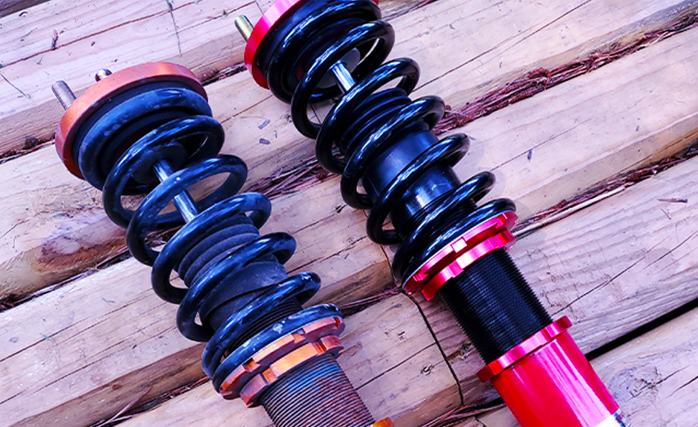
New against old! Install was just as simple.
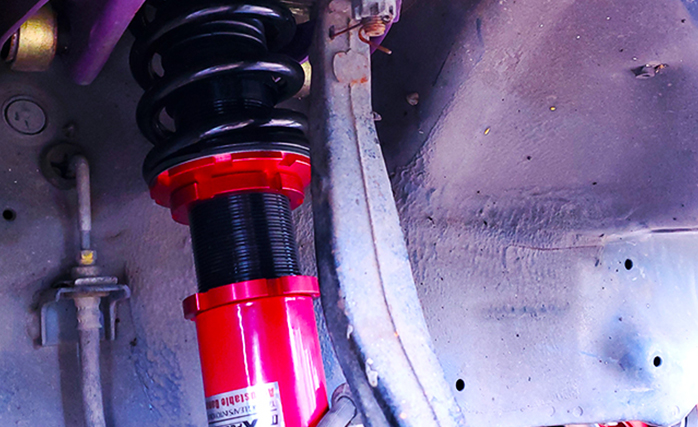
I have had good time to drive around and get a good feel of the coilovers and I am impressed.
The damping feature helps dial in stiffness or softness in between the front and rear to better assist with traction concerns, whether it is straight line or cornering, and they are a very smooth ride, even at the stiffest setting. They can provide a ride height close to stock, or slam the belly on the ground drop if that’s what you like, and a good range in between. When you look at the cost, I honestly did not expect to get the quality product that I did, for the price listed. These coilovers do not disappoint!
Installation is pretty straightforward, but professional assistance is always recommended for anyone not looking to take on the task, or if you’re new to adjustable suspension.
The process is pretty simple though, should you wish to take it on yourself. Simply pre-adjust each coil length, before installing, by loosening the bottom lock nut and raising it up to where you want it to sit, then raise the lower shock body til it meets and locks again with the lower lock ring, (right tighty, lefty loosey fashion). When you’re satisfied, they should measure equally from the top of the body plate, to the top of the lower lock ring (see picture 1)
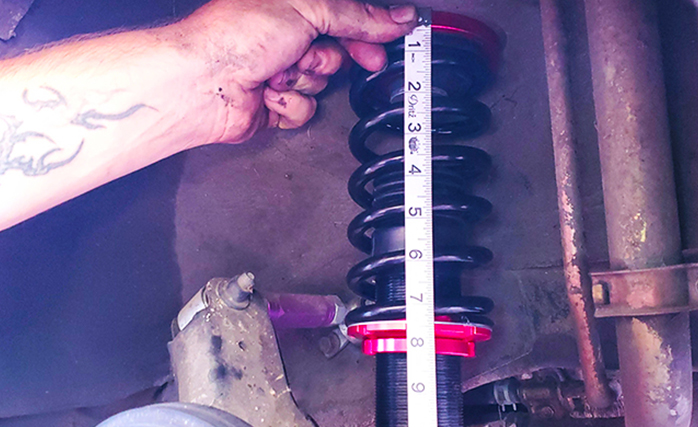
I measured mine to 10 inches on all of them. This is done before pre-loading and tightening them down.
Once you’re happy with your height, pre-load the coil by placing a small trolley jack under the ball joint and raise it enough to where it would sit if it were lowered to the ground; the lower control arm should be parallel to the ground, then tighten the upper and lower coilover bolts.
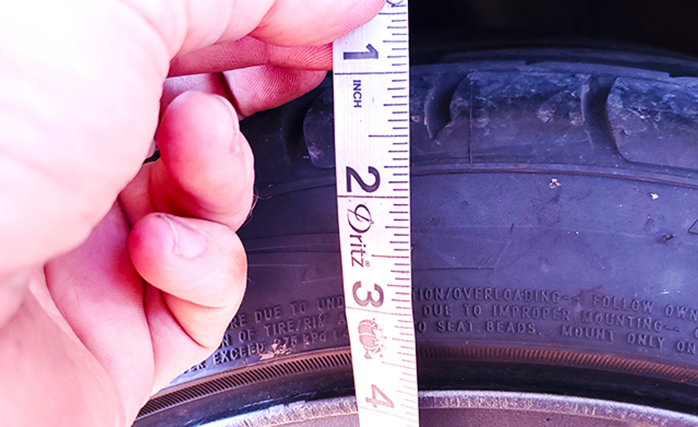
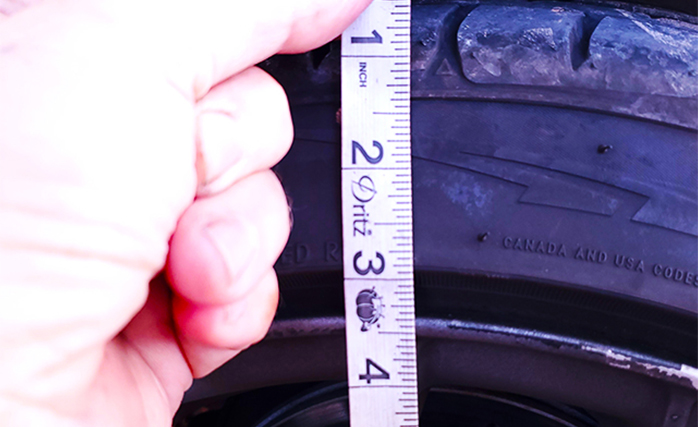
After all have been completed, replace your wheels and remove your jack stands and lower the vehicle to the ground. Once it is on the ground, measure each wheel.
These measurements will be taken from the bottom lip of each fender, to the top lip of the rim (see picture 2 and 3)

As mentioned, your adjustments will depend on your driving demands. Once you’re satisfied with how your ride characteristics feel, you’re complete! Although not necessary; I suggest checking them at a minimum of each oil change interval (3 months/3000 miles) to ensure you’re still where you want it set (adjust as needed). It only takes a couple additional minutes to do so, and is worth the added peace of mind!


.png?x-oss-process=image/auto-orient,1/quality,q_100/resize,m_mfit,w_170,h_170)


.jpg?x-oss-process=image/auto-orient,1/quality,q_100/resize,m_mfit,w_350,h_350 "Maxpeedingrods Tuning Full Coilovers Kit Suspensions Shocks Damper Adjustable compatible for Honda Civic 1988-1991 EC ED EE EF lowering kit")
.jpg?x-oss-process=image/auto-orient,1/quality,q_100/resize,m_mfit,w_350,h_350 "Maxpeedingrods Twin-Tube Damper Adjustable Coilover Suspension Kits Compatible for Honda Civic 1988-1991 EC ED EE EF lowering kit")
.jpg?x-oss-process=image/auto-orient,1/quality,q_100/resize,m_mfit,w_350,h_350 "Universal Turbo Oil Line Kits Feed Return Drain Line T3 T4 T70 T66 T25")
.jpg?x-oss-process=image/auto-orient,1/quality,q_100/resize,m_mfit,w_350,h_350 "Universal T3 T4 T04E Turbo Turbocharger .57 A/R Oil Cooled for 1.5-2.5L 400HP")
.jpg?x-oss-process=image/auto-orient,1/quality,q_100/resize,m_mfit,w_350,h_350 "Compatible for Honda Civic 1992-1995 EJ EG EH 1996-2000 EJ EK EM Adj. Damper Coilover Coil Spring Strut lowering kit")
.jpg?x-oss-process=image/auto-orient,1/quality,q_100/resize,m_mfit,w_350,h_350)
.jpg?x-oss-process=image/auto-orient,1/quality,q_100/resize,m_mfit,w_350,h_350)
.jpg?x-oss-process=image/auto-orient,1/quality,q_100/resize,m_mfit,w_350,h_350)