(1) 213-459-3517

.jpg?x-oss-process=image/auto-orient,1/quality,q_100/resize,m_mfit,w_1000,h_1000 "Compatible for Subaru Forester 1998-2002 Complete Adjustable Height Shocks Coilovers Suspension Kit lowering kit")

.jpg?x-oss-process=image/auto-orient,1/quality,q_100/resize,m_mfit,w_1000,h_1000 "Compatible for Subaru Forester 1998-2002 Complete Adjustable Height Shocks Coilovers Suspension Kit lowering kit")
.jpg?x-oss-process=image/auto-orient,1/quality,q_100/resize,m_mfit,w_1000,h_1000 "Compatible for Subaru Forester 1998-2002 Complete Adjustable Height Shocks Coilovers Suspension Kit lowering kit")
.jpg?x-oss-process=image/auto-orient,1/quality,q_100/resize,m_mfit,w_1000,h_1000 "Compatible for Subaru Forester 1998-2002 Complete Adjustable Height Shocks Coilovers Suspension Kit lowering kit")
.jpg?x-oss-process=image/auto-orient,1/quality,q_100/resize,m_mfit,w_1000,h_1000 "Compatible for Subaru Forester 1998-2002 Complete Adjustable Height Shocks Coilovers Suspension Kit lowering kit")
.jpg?x-oss-process=image/auto-orient,1/quality,q_100/resize,m_mfit,w_1000,h_1000 "Compatible for Subaru Forester 1998-2002 Complete Adjustable Height Shocks Coilovers Suspension Kit lowering kit")
.jpg?x-oss-process=image/auto-orient,1/quality,q_100/resize,m_mfit,w_1000,h_1000 "Compatible for Subaru Forester 1998-2002 Complete Adjustable Height Shocks Coilovers Suspension Kit lowering kit")
.jpg?x-oss-process=image/auto-orient,1/quality,q_100/resize,m_mfit,w_1000,h_1000 "Compatible for Subaru Forester 1998-2002 Complete Adjustable Height Shocks Coilovers Suspension Kit lowering kit")
.jpg?x-oss-process=image/auto-orient,1/quality,q_100/resize,m_mfit,w_1000,h_1000 "Compatible for Subaru Forester 1998-2002 Complete Adjustable Height Shocks Coilovers Suspension Kit lowering kit")
.jpg?x-oss-process=image/auto-orient,1/quality,q_100/resize,m_mfit,w_1000,h_1000 "Compatible for Subaru Forester 1998-2002 Complete Adjustable Height Shocks Coilovers Suspension Kit lowering kit")
.jpg?x-oss-process=image/auto-orient,1/quality,q_100/resize,m_mfit,w_1000,h_1000 "Compatible for Subaru Forester 1998-2002 Complete Adjustable Height Shocks Coilovers Suspension Kit lowering kit")


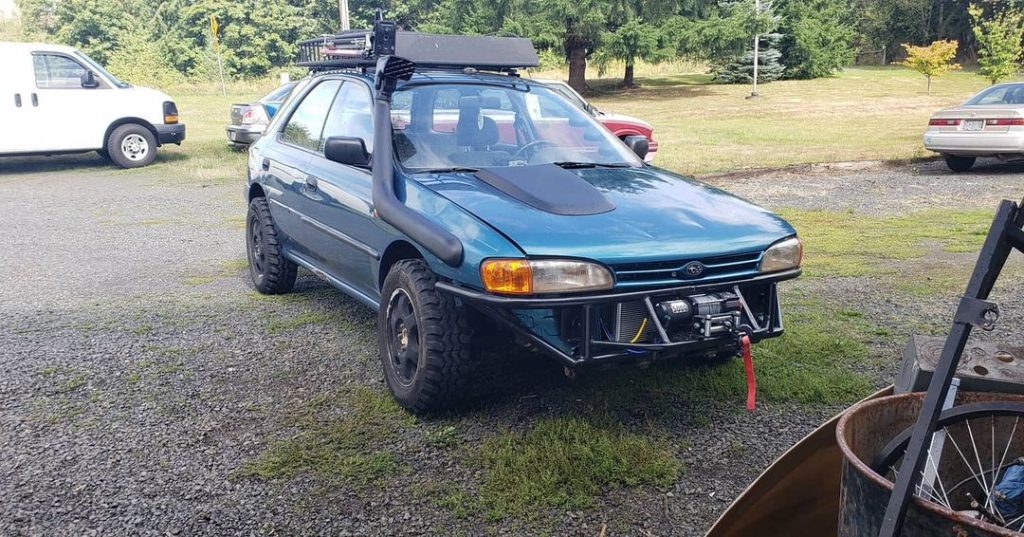
Editor’s Note: The install guide was shared by Michael Bailey, a professional mechanic who did awesome projects on his page. He bought a set of MaXpeedingRods coilovers and for Subaru Forester and a 3″ lift for Subaru Impreza. Below is how he install the coilover and 3″ lift on his 1993 Subaru Impreza.
Vehicle Set-Up
2. Jack up the vehicle and place securely on the jack stands.
3. Remove all 4 wheels and tires.
4. Disconnect front and rear sway bars if applicable.
Front Strut Removal
2. Mark the orientation of the Upper knuckle bolt. This bolt is used for camber setting on your vehicle.
3. Remove Upper and lower strut mounting bolts on the knuckle.
5. Remove the 3 top hat mounting bolts from the strut tower. Do not remove the large center nut. This will allow the compressed spring to come unsecured and will cause bodily harm.
6. Remove strut from the car.
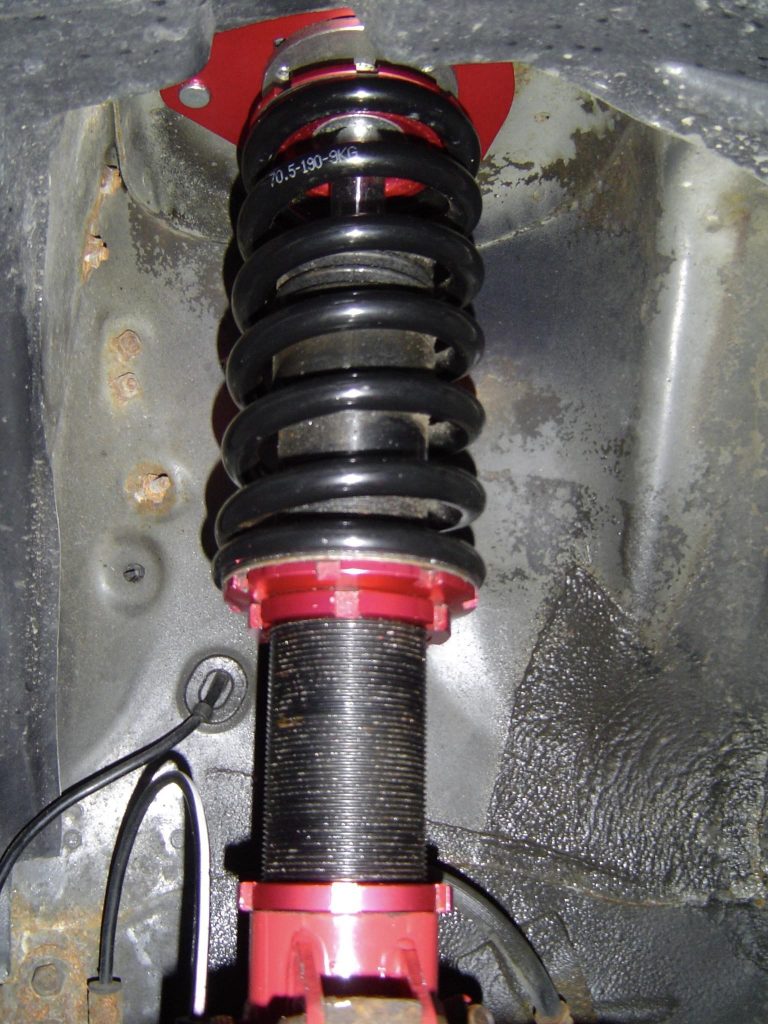
Install The Front Coilover/Spacer
1. Unbox your newly purchased MaXpeedingRods coilovers. Select the appropriate coilover. This can be done by matching them up to the removed front struts.
2. Unscrew the spring tension nut on the bottom of the spring releasing tension from the spring. Then run the nut up to where the nut is contacting the spring and the spring is just contacting the upper spring seat. Measure the length of the spring and continue turning the lower spring tension nut until you have compressed the spring 1/2. Lock the lower spring tension nuts against each other using the supplied spanner.
3. Now install the spacer on top of the coilover top hat and tighten the nuts.
4. With the camber plates facing perpendicular to the vehicle. slide the 3 spacer mounting studs through the strut tower and tight the nuts finger tight.
5. Lift the knuckle into the lower mounting portion on the coilover and insert the two mounting bolts that were removed prior. The camber bolt on top and the straight bolt on the bottom.
6. Turn the camber bolt to the previously marked orientation hold the bolt with a wrench and tighten the nut. Tighten the lower bolt in the same manner.
7. Tighten the spacer nuts to the strut tower.
8. Bolt brake line to coilover on a supplied bracket.
Rear Strut Removal
Take the front strut removal steps for reference as they are pretty much the same.
Install The Rear Coilover/Spacer
2. Unscrew the spring tension nut on the bottom of the spring releasing tension from the spring. Then run the nut up to where the nut is contacting the spring and the spring is just contacting the upper spring seat. Measure the length of the spring and continue turning the lower spring tension nut until you have compressed the spring 1/2. Lock the lower spring tension nuts against each other using the supplied spanner.
3.Set the overall length of your coilover measure from the top of the top hat to the lower mounting hole to the same length as the previously removed strut.
4. Hold the new spacer up to the bottom of the rear strut tower and orientate the holes approximately 15 degrees clockwise from the existing set of holes and center the large center hole in the spacer on the existing large center hole. Mark the 3 stud locations on the strut tower.
5. Drill the marked holes to 3/8″ diameter (9.5mm).
6. Install new rear coilover spacer onto rear coilover and tighten the nuts.
7. Insert the new coilover with spacer into the strut tower and run the nuts down on the studs finger tight.
8. Lift the rear knuckle into the lower coilover mount and insert the previously removed bolts.
9. Tight both lower bolts and 3 Upper nuts in the strut tower.
Ride Height Adjustment
2. Set the vehicle back on the ground.
3. Roll the vehicle at least one complete tire rotation.
4. Check your ride height in the same exact places it was check before at all 4 corners. Record the measurements.
5. If the vehicle is not at the desired ride height that higher than stock, place the vehicle back on the jack stands as previously described.
6. Remove all 4 wheels and tires. Using the supplied spanner loosen the height adjustment nut on the lower strut mount.
7. Using the supplied spacer wrenches. Turn the lower lock nut at the bottom of the spring to turn the coilover assembly in the direction of the desired height correction.
8. Once all height corrections have been made at the 4 corners, reinstall wheels and tires. And repeat steps 1-7 until the desired height is achieved.
Final Inspection
2. Reconnect front and rear sway bars.
3. Recheck all bolts for tightness.
4. Reinstall wheels and tires.
5. Set the vehicle back on the ground.
Note: Your vehicle will need an alignment after the lift has been installed as altering the height of the vehicle will change alignment settings. Your vehicle may also require additional means of camber adjustment in the rear that is not supplied in this kit.


.png?x-oss-process=image/auto-orient,1/quality,q_100/resize,m_mfit,w_170,h_170)


.jpg?x-oss-process=image/auto-orient,1/quality,q_100/resize,m_mfit,w_350,h_350 "Rear Caliper Adapters Brake Adapters compatible for Subaru FHI 2 Pot2002-2005")
.jpg?x-oss-process=image/auto-orient,1/quality,q_100/resize,m_mfit,w_350,h_350 "H-Beam Connecting Rods Set compatible for Subaru EJ20 EJ25 Impreza WRX STI 5.137")
.jpg?x-oss-process=image/auto-orient,1/quality,q_100/resize,m_mfit,w_350,h_350 "24 Click Damper Coilovers Kit compatible for Subaru Forester 1998-2002 Coil Springs & Strut")
.jpg?x-oss-process=image/auto-orient,1/quality,q_100/resize,m_mfit,w_350,h_350 "Sway Bar End Links Kit FrontRear compatible for Subaru Impreza WRX WAGON 93-06 07 new")
.jpg?x-oss-process=image/auto-orient,1/quality,q_100/resize,m_mfit,w_350,h_350 "Suspension Leveling Lift Kit 3 Compatible for Subaru Forester 1998-2008 2003 2004 2005")
.jpg?x-oss-process=image/auto-orient,1/quality,q_100/resize,m_mfit,w_350,h_350)
.jpg?x-oss-process=image/auto-orient,1/quality,q_100/resize,m_mfit,w_350,h_350)
.jpg?x-oss-process=image/auto-orient,1/quality,q_100/resize,m_mfit,w_350,h_350)
.jpg?x-oss-process=image/auto-orient,1/quality,q_100/resize,m_mfit,w_350,h_350)
.jpg?x-oss-process=image/auto-orient,1/quality,q_100/resize,m_mfit,w_350,h_350)
.jpg?x-oss-process=image/auto-orient,1/quality,q_100/resize,m_mfit,w_350,h_350)
.jpg?x-oss-process=image/auto-orient,1/quality,q_100/resize,m_mfit,w_350,h_350)